The Complete Vibe Coding SaaS Starter Stack (2026): Every Tool You Need
The opinionated, battle-tested SaaS starter stack for vibe coders in 2026. From code editor to analytics, we cover every tool you need — with real costs, setup tips, and alternatives for every budget.

Key Factors to Consider
- → Code editor: Cursor for complex projects, Lovable for MVPs
- → Database + Auth: Supabase
- → Payments: Stripe
- → Hosting: Vercel
- → Email: Resend
- → Analytics: PostHog
Why You Need an Opinionated Stack
The number one time sink for new SaaS builders is not building features — it is researching tools. I have seen indie hackers spend two weeks evaluating database options before writing a single line of code. That is two weeks of lost momentum on a product that might not even find its market.
This guide gives you a complete, opinionated stack. Every tool listed here is one I have personally used to build production SaaS products — including AgilityWriter.ai, BrandPeek.ai, and LocusPilot.com. These are not theoretical recommendations. They are the tools that actually work together when you are trying to ship a real product.
The total cost for this stack on free tiers: $20 per month (just your Cursor subscription). The total cost for production-grade with paid tiers: roughly $90 to $150 per month. Both are realistic for indie SaaS builders.
The Stack at a Glance
Before we dive into each tool, here is the full stack:
| Layer | Tool | Monthly Cost (Free) | Monthly Cost (Pro) |
|---|---|---|---|
| Code Editor | Cursor | $20 | $20-40 |
| Database + Auth | Supabase | $0 | $25 |
| Payments | Stripe | Pay-as-you-go | Pay-as-you-go |
| Hosting | Vercel | $0 | $20 |
| Resend | $0 | $20 | |
| Analytics | PostHog | $0 | $0-45 |
| Version Control | GitHub | $0 | $0 |
| Total | $20 | $85-150 |
Layer 1: Code Editor — Cursor
Why Cursor: After testing every major AI coding tool for SaaS development, Cursor consistently produces the highest quality code for complex, multi-file projects. Its multi-file context understanding means it can generate an API route that correctly references your database schema, auth middleware, and type definitions — all without you having to manually paste context.
When to use Lovable instead: If you are a non-technical founder building your first MVP and just need something live on the internet as fast as possible, Lovable gets you there faster. Use it to validate your idea with real users, then migrate to Cursor when you need complex backend features.
Setup in 5 minutes:
- Download Cursor from cursor.com
- Sign up for Pro ($20/month)
- Open your project folder
- Select Claude as your AI model (best for SaaS code)
- Start building
Pro tip: Create a .cursorrules file in your project root that describes your tech stack, coding conventions, and project architecture. This dramatically improves code generation quality.
Layer 2: Database + Auth — Supabase
Why Supabase: Supabase gives you a PostgreSQL database, authentication, realtime subscriptions, edge functions, and file storage in a single platform with a generous free tier. For vibe-coded SaaS, this eliminates the biggest integration headache — getting your database, auth, and API layer to work together.
In my testing, Supabase’s Row Level Security (RLS) is the single most important security feature for vibe-coded SaaS. It ensures that even if your AI-generated code has permission bugs, users can only access their own data at the database level.
The free tier includes:
- 500 MB database storage
- 50,000 monthly active users for auth
- 500 MB file storage
- 500,000 edge function invocations
That is more than enough to launch and get your first hundred paying customers.
When to consider alternatives:
- Firebase if you are building in the Google ecosystem and need Firestore’s real-time capabilities
- Neon if you want a standalone serverless Postgres without the full Supabase platform
- Clerk for auth only if you need advanced multi-tenancy features
Setup essentials:
- Create a Supabase project (takes 60 seconds)
- Set up your database schema using the SQL editor or the visual table editor
- Enable Row Level Security on every table — this is non-negotiable
- Configure auth providers (email, Google OAuth at minimum)
- Store your Supabase URL and anon key in environment variables
Layer 3: Payments — Stripe
Why Stripe: Stripe is not just the best payment platform for SaaS — it is effectively the only serious option for subscription billing. Stripe Checkout gets you a production-ready payment flow in hours, and Stripe Billing handles subscription management, invoicing, usage tracking, and dunning automatically.
I have integrated Stripe into three production SaaS products. The initial integration takes about a day with an AI coding tool. After that, Stripe handles the complexity of recurring billing, failed payments, subscription upgrades, prorations, and tax calculation without you writing custom logic.
What you need for a basic SaaS billing setup:
- Stripe account (free to create, 2.9% + 30 cents per transaction)
- Products and Prices configured in the Stripe dashboard
- Stripe Checkout for the payment flow
- Webhook endpoint to handle subscription events
- Customer portal for self-service subscription management
The webhook is the critical piece. When a customer subscribes, upgrades, or cancels, Stripe sends events to your webhook endpoint. Your backend processes these events and updates the user’s access level in Supabase. This is where AI coding tools like Cursor excel — they generate webhook handlers that correctly map Stripe events to database updates.
Cost reality: Stripe’s 2.9% + 30 cents per transaction means you pay $3.19 on a $100 subscription. On a $10/month product, you pay $0.59 per transaction. There are no monthly fees — you only pay when you make money.
Layer 4: Hosting — Vercel
Why Vercel: Vercel turns deployment from a DevOps project into a single git push. Connect your GitHub repository, and every push to main automatically deploys to production. Every pull request gets a preview deployment with its own URL. This is the deployment experience that SaaS builders deserve.
Vercel’s free tier includes 100 GB bandwidth, serverless functions, and edge functions. For most early-stage SaaS products, you will not pay anything for hosting until you have significant traffic.
When to consider alternatives:
- Netlify if you are not using Next.js and want a framework-agnostic platform
- Railway if your SaaS needs a dedicated backend server (custom APIs, background workers, WebSockets)
- Cloudflare Pages if you want the cheapest option with global edge distribution
Setup in 3 minutes:
- Push your code to GitHub
- Connect your GitHub repo to Vercel
- Vercel auto-detects your framework and deploys
- Add your custom domain
- Every future git push deploys automatically
Layer 5: Email — Resend
Why Resend: Resend is built for developers, not marketers. The API is clean, the documentation is excellent, and if you are using React or Next.js, you can build email templates as React components. Your SaaS needs transactional email for: welcome emails, password resets, subscription confirmations, usage alerts, and notification digests.
The free tier gives you 100 emails per day — enough for early-stage SaaS. The first paid tier at $20/month gives you 50,000 emails per month.
Setup:
- Create a Resend account
- Verify your domain (add DNS records)
- Install the Resend SDK in your project
- Create email templates (React Email or HTML)
- Send emails from your API routes or edge functions
Alternative: If you need marketing email alongside transactional (newsletters, drip campaigns), consider Loops or Postmark instead. Resend is focused on transactional email.
Layer 6: Analytics — PostHog
Why PostHog: PostHog replaces four or five separate tools with one platform. You get product analytics (who uses what), session replay (watch users interact), feature flags (roll out features gradually), and A/B testing. For a SaaS builder, knowing which features users actually use is the difference between building what matters and building what you assume matters.
The free tier is remarkably generous: 1 million events per month, 5,000 session recordings, and unlimited feature flags. Most SaaS products will not exceed this until they have hundreds of active users.
What to track from day one:
- Sign-up events (track your conversion funnel)
- Feature usage (which features do users actually touch)
- Subscription events (who upgrades, who churns)
- Error events (what breaks in production)
Version Control: GitHub
This one is non-negotiable and free. Every line of code your AI generates should be committed to a Git repository on GitHub. This gives you:
- History: Roll back any change that breaks your app
- Collaboration: AI tools like Cursor work directly with Git
- Deployment: Vercel and Netlify deploy from GitHub automatically
- Backup: Your code lives in the cloud, not just on your laptop
The Budget Breakdown: Three Tiers
Bootstrapper Tier ($20/month)
- Cursor Pro: $20
- Supabase Free: $0
- Vercel Free: $0
- Stripe: pay-as-you-go
- Resend Free: $0
- PostHog Free: $0
- GitHub Free: $0
This gets you a fully functional SaaS with auth, payments, hosting, email, and analytics. You can launch and serve your first 100 customers on this budget.
Growth Tier ($90/month)
- Cursor Pro: $20
- Supabase Pro: $25
- Vercel Pro: $20
- Stripe: pay-as-you-go
- Resend Starter: $20
- PostHog Free: $0
- GitHub Free: $0
Upgrade when you have paying customers and need more database storage, faster builds, and higher email limits.
Scale Tier ($150+/month)
- Cursor Business: $40
- Supabase Pro: $25
- Vercel Pro: $20
- Railway (backend): $20+
- Stripe: pay-as-you-go
- Resend Pro: $20
- PostHog Growth: $0-45
- GitHub Free: $0
This is the setup for a SaaS generating real revenue that needs dedicated backend infrastructure and production-grade services across the board.
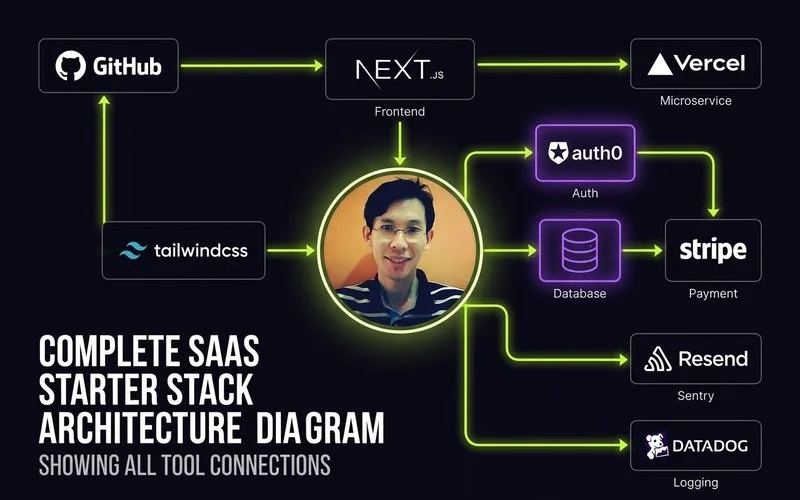
How These Tools Connect: The Integration Map
Understanding how these tools talk to each other is critical for building a working SaaS:
- Cursor generates your code locally, which you push to GitHub
- GitHub triggers Vercel to deploy automatically
- Your app frontend talks to Supabase for auth and database operations
- When a user clicks “Subscribe,” your app redirects to Stripe Checkout
- Stripe sends webhook events to your Vercel serverless function
- Your webhook handler updates the user’s subscription status in Supabase
- Resend sends a confirmation email via your API route
- PostHog tracks the subscription event for your analytics dashboard
This entire flow — from user clicking “Subscribe” to receiving a confirmation email — takes about 3 seconds. And with Cursor generating the integration code, you can set it up in a day.
Common Integration Pitfalls
Supabase RLS blocking your API calls. If your serverless function cannot read or write to Supabase, Row Level Security is probably blocking it. Use the service_role key (never exposed to the client) for server-side operations.
Stripe webhook signature verification failing. Vercel passes the raw request body differently than Express. Make sure you are using await request.text() instead of parsing JSON first — Stripe needs the raw body to verify the webhook signature.
Environment variables not available in production. Every service connection requires API keys stored as environment variables. Add them in Vercel’s dashboard under Settings, not just in your local .env file.
CORS errors on Supabase calls. If your frontend cannot reach Supabase, check that your Supabase URL and anon key are correct. Supabase handles CORS automatically — if you are getting CORS errors, you likely have the wrong URL.
What This Stack Does Not Include (And When You Need It)
Custom domain email (e.g., hello@yourapp.com): Use Google Workspace ($6/month) or Zoho Mail (free for 5 users). This is separate from transactional email.
Error monitoring: Sentry has a generous free tier and catches production errors that PostHog analytics might miss. Add it once you have users.
Uptime monitoring: BetterStack or UptimeRobot (both have free tiers) will alert you when your SaaS goes down. Essential once you have paying customers.
Background jobs: If you need recurring tasks (daily reports, data syncing), look into Vercel Cron or Inngest. Railway is better for long-running background workers.
Next Steps
- Set up your Cursor workspace and push your first commit to GitHub
- Create your Supabase project and design your database schema
- Connect Vercel to your GitHub repo for automatic deployments
- Follow our deployment guide for the complete setup walkthrough
- Add authentication as your first feature
- Integrate Stripe payments when you are ready to charge
The best stack is the one you actually use to ship. Stop researching and start building.

Adam Yong
Founder & Lead Builder
SaaS builder running 3 live products. Reviews tools by building real SaaS features with them.